Like many skills in life, the key to mastering the art of optometry consists of the three Ps: Practice, Practice and more Practice.


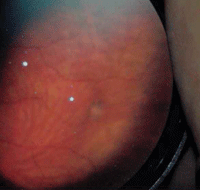
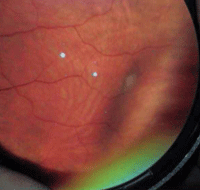
1. This patient presented with a retinal traction tuft (left). Note the enhanced detail upon application of scleral depression (right).
The formula for success is straightforward: The more you use your talents, the easier they are to maintain.
Unfortunately, some optometrists never have the opportunity to practice specialized clinical skills, such as scleral depression, on a regular basis.
On the other hand, you may use different clinical skills several times a day––automatically applying them without reflection upon the fundamentals and tricks of the trade that make the technique more effective.
In this first article of this three-part series, “The Lost Arts of Optometry,” we review the clinical value and proper execution of scleral depression.
The Purpose of Scleral Depression
Did you know that, even with maximum pupillary dilation, you might be overlooking a critical portion of your patient’s peripheral fundus in areas near the pars plana and ora serrata? In fact, the patient’s iris, crystalline lens and/or ocular globe frequently obscure this section of the retina. In conjunction with binocular indirect ophthalmoscopy (BIO), scleral depression is an excellent (but often neglected) method for seeing a detailed view of the peripheral fundus.
By inserting the tip of the scleral depressor between the globe and the orbit, the space occupied by the probe displaces the retina inward and creates an elevation. This technique enhances the contrast between a retinal lesion and the surrounding retinal tissue. In doing so, scleral depression helps you locate and diagnose lesions that may otherwise go undetected. This process also can be used to examine retinal lesions that are not well defined, such as suspected retinal holes, tears or vitreoretinal adhesions (figure 1).
Scleral depression is particularly useful in assessing patients who present with complaints of flashes and floaters. For example, it is an effective way to rule out peripheral breaks as an underlying cause of the symptoms.

2. Various types of scleral depressors, including a cotton-tip applicator, flat double-ended and multiple thimble designs.
Scleral depression is also helpful when examining patients who are at risk for peripheral retinal anomalies, such as high myopes or those with a history of blunt trauma.
Keep in mind that a healthy retina does not have round-, linear-, arc- or geometrically-shaped lesions located in the periphery. So, these lesions always require a closer look with scleral depression.

3. The
Josephberg-Besser scleral depressor (Stephens Instruments) is a modified
thimble design that features a curved blade.
While scleral depression is useful in many instances, it is contraindicated under certain circumstances. Examples include patients with an open globe injury, hyphema, a scleral buckle and/or a filtering bleb, as well as those who recently underwent ocular surgery.
Remember that scleral depression temporarily increases intraocular pressure, so be especially cautious in ocular hypertensives.
Tools of the Trade
There are three primary designs of scleral depressors: thimble, flat double-ended and cotton-tip applicator (figure 2). Your choice of instrument mainly depends upon personal preference.
Some practitioners are partial to the thimble depressor because it allows more freedom to manipulate the lids, while others prefer the convenience of a cotton-tip applicator.
(Despite their ease of use, cotton-tip applicators generally are more difficult to move across the lids and are less effective at posterior depression.)
Recently patented, the Josephberg-Besser scleral depressor (Stephens Instruments) uses a wider, more ergonomically curved blade, which is reportedly more comfortable for both the examiner and patient (figure 3).1
How to Perform the Technique
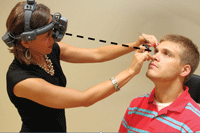
Scleral depression is a relatively straightforward procedure that requires a lot of dexterity and a high level of competency with the binocular indirect ophthalmoscope (see “BIO: A Companion to Scleral Depression”). In order to achieve successful scleral depression, your view and the BIO’s oculars must both be aligned with the quadrant being viewed and the patient’s direction of gaze (figure 4). When perfect alignment with the viewing axis is achieved, a red reflex appears in the patient’s pupil through the BIO’s oculars without the condensing lens in place.
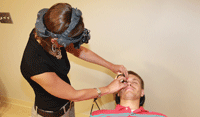
To that end, patient positioning is essential to the technique. Some practitioners choose to perform BIO and scleral depression with the patient upright. Others place the patient in a supine position with the chair reclined (figure 5). Regardless of position, you must be able to approach the patient on a tangential plane to the pupil.


4,5. During scleral depression, there should be perfect alignment between you, the BIO lens and the retinal quadrant being viewed (left). Also, you may choose to examine the patient upright, or in a supine position (right).
Prior to initiating scleral depression, the patient should be fully dilated. Use both 1% tropicamide and 2.5% phenylephrine. Instill a drop of 0.5% proparacaine prior to the procedure to increase comfort and reduce the patient’s need to blink.
Start by identifying an area of peripheral retina to be examined. Ask the patient to look in the opposite direction, then apply the scleral depressor to the lid at a location about 5mm to 8mm behind the limbus. Ask the patient to slowly change fixation and look in the direction of the area to be examined.
As he or she shifts fixation, the scleral depressor should follow along the eye perpendicularly, gently pulling the lid with it. Next, apply gentle pressure tangentially. Watch the red pupillary reflex, and look for it to darken slightly or appear as a shadow; this signifies that scleral depression is now in the proper location (figures 6 and 7). Then, simply move the condensing lens into place to acquire a view.
To get a more three-dimensional view of an anomaly, move the depressor both horizontally and vertically over the lid under the area of interest, enabling a cross-sectional view of the lesion. The 3D view permits better visualization of retinal breaks or subretinal fluid.
Because of lid configuration, performing scleral depression at 3 and 9 o’clock is always a challenge. Instead of applying pressure directly to the globe itself, maneuver the depressor to slide the lid over this area.
It’s challenging to achieve a good view of areas in the retinal periphery located closest to the ora serrata. To do so, try physically moving up and down or side-to-side while maintaining a good, crisp view of the fundus.

6, 7. Red reflex without (top) and with depression (right). Upon proper application of the scleral depressor on the eyelid and appropriate positioning, you’ll achieve a darker reflex.

Remember that the more extreme the patient’s position of gaze, the more peripheral areas you will be able to identify. If the patient does not move his or her eyes as much, areas closer to equator will be in view.
When you approach the far periphery, the fundus view will seem to “blink” in and out within your condensing lens. This means you’ve reached the viewing limit of the BIO. You will then have to use the blink in order to peer into the far periphery and search for any anomaly.
Note that if the depressor is pushed perpendicular to the eye or is pressing on a muscle insertion, the patient will feel uncomfortable. Little pressure is required during this procedure. If the patient shows signs of pain or discomfort, you are likely depressing too hard.
Even though you may not perform scleral depression on every patient, it’s wise to practice and hone this skill for use when necessary. Be sure to apply the tips and tricks highlighted above to ensure that this technique does not become a “lost art” for you.
Look for part two of this series, “Put the ‘Fun’ Back Into the Fundus Examination,” in next month’s issue.
Dr. Dinardo is an assistant professor at the Michigan College of Optometry in Big Rapids. Dr. Walling is a professor and chief of the Medical and Surgical Service at MCO’s University Eye Center.
1. Josephberg RG, Besser E. A New Scleral Depressor. Retina Today. 2012 May/June; 8(4):79.
Along with scleral depression,
binocular indirect ophthalmoscopy remains a critical skill for detecting
the many subtleties that exist in the peripheral retina. BIO
facilitates detection of small retinal excavations and elevations, while
also permitting an exceptional stereoscopic view of the posterior pole,
equator and periphery. Additionally, the BIO technique is not limited
by the patient’s refractive error, and you can visualize the posterior
pole through even moderately opaque media (i.e., cataract). When performing BIO, the light
intensity should be sufficiently bright to visualize small retinal
details and color differences. If you have trouble acquiring a view
because of the patient’s light sensitivity, try to examine the posterior
pole first with a lower intensity. This usually desensitizes the
patient so that the peripheral examination is not as obtrusive.
Binocular indirect ophthalmoscopes are
now available with a small-pupil feature that can help visualization in
patients who do not fully dilate. If you don’t have a model with this
feature, you can hold your condensing lens out farther than normal and
spread the oculars far apart. This simulates the compensating prism of
the small pupil models and may provide a better view. Examine the retina in a systematic
fashion to improve efficiency, provide a context in which the exam
findings can be recalled and recorded, and reduce the likelihood that
you’ll overlook portions of the fundus. Don’t forget about the
equatorial region.
It is often missed when looking for peripheral
retinal detachment or serous maculopathy. Also, use the red-free filter
to your advantage—it aids in examining retinal vasculature, hemorrhages
and the nerve fiber layer by providing a greater level of contrast.
Recent advances in BIO lenses have
produced a wide variety of available options (see “Grading Common BIO
Condensing Lenses,” below). Several lenses now provide a much more
efficient and detailed examination of the retina, macula and/or optic
nerve.
The type of condensing lens you choose for each patient scenario
is important. Often, we use just a few of our favorite lenses; however,
we need to know the advantages and disadvantages of each condensing lens
to fully exploit their capabilities in each scenario. The 20D BIO lens is a good “workhorse”
selection because it offers an ideal combination of magnification and
field of view. It is a relatively low-powered lens that can be used to
perform almost any fundus examination.
Higher magnification lenses, such as
the 15D, are effective for evaluating the posterior pole. They provide a
clear, stereoscopic view of the macula, optic nerve and nerve fiber
layer. These lenses might be useful when examining patients who cannot
be positioned at a slit lamp.
But one disadvantage of a very high
magnification BIO lens is its fairly lengthy working distance. Long
fingers and steady hands also are necessary to use these lenses
properly. Medium magnification lenses, such as
the 28D, are good for patients with small pupils or a constricted,
opaque capsulorhexis. They provide a larger field of view at the expense
of magnification. So, keep in mind that detail may be compromised when
using such a BIO lens.
Medium to low magnification lenses are
helpful when performing pediatric examinations or screening
institutionalized patients (that is, whenever a quick, wide view of the
retina is required). Practitioners can view a large retinal segment at
one time to rule out any obvious disease.
Most condensing lenses are available
with a yellow filter to block short-wavelength light. This can increase
patient comfort while performing the examination. However, note that
subtle color differences in the retina may not be as obvious when using
such a lens. For many practitioners, it is a matter of personal
preference
BIO: A Companion to Scleral Depression
Grading Common BIO Condensing Lenses
Lens
Posterior Pole
Equator
Periphery
High Magnification
15D
Excellent
Good
Poor
20D
Good
Excellent
Excellent
Medium Magnification
28D or 30D
Good, but reduced image size
Good, but reduced image size
Good, but reduced image size
Low Magnification
40D
Poor
Good for screening
Good for screening

