Was it a touchdown, or did his knee drop just before the goal line? The championship game is on and before the review team in the box can make the call, your phone rings. “Doc, hate to bother you during the big game, but I just can’t take it any longer. I was working under my car yesterday, and I thought it would get better, but…” and the rest is history.
Removing corneal foreign bodies can be one of the most rewarding aspects of the profession. They can interrupt a full day—or the season’s championship game. But when handled professionally and efficiently, this procedure not only preserves sight but also generates loyal and referring patients.
This article is the first in a new six-part series that will show you, step-by-step, the essential procedures you can do at the slit lamp. Plus, you’ll find a short but thorough video on the Review website to walk you through each procedure.
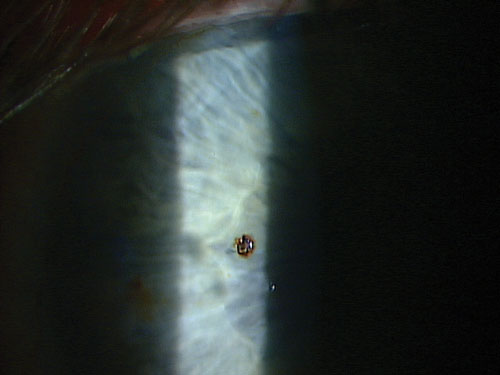 | |
| The patient in this case was grinding metal without protective eyewear. |
1. Spread the Word
The first step in removing corneal foreign bodies is having patients. Despite optometrists’ advances in scope of practice and adopting the medical model, many patients still think of the ER or their primary care provider when their eyes hurt and they suspect they have something in their eyes.
Do you take every opportunity to remind your patients that you and your fellow optometrists remove all kinds of objects from the eye on a daily basis? A simple technique that we’ve found to be very effective is to hand the patient your card, and then write your cell phone or after-hours service number on it, and let them know that they will receive specialized care—and save time and money—when they call your office for an eye emergency. A win-win situation.
Another idea: Can a patient visit your website or your Facebook page and watch a video of you removing a corneal foreign body and hear your soothing voice? We made a video. So can you. (See ours on www.reviewofoptometry.com.)
2. Set Up Phone Triage
The second step is to educate your staff so they are prepared to deal with the patient with a presumed foreign body. It starts at the front desk. Train your welcome leader to recognize the signs of a corneal foreign body over the phone and understand the importance of instructing the patient to come directly to the office.
We keep it simple and emphasize the three calling cards of corneal problems: pain, photophobia and lacrimation. (Or, in the patient’s words, “It hurts and waters, especially in the sun.”)
3. Take a Careful History
Before you pick up that spud and spin that Alger brush, first take a thorough history to prepare for the procedure. Like a good investigator, ask the important questions: what, when, where and how? In the vast majority of cases, the story is generally explained very quickly.
|
|
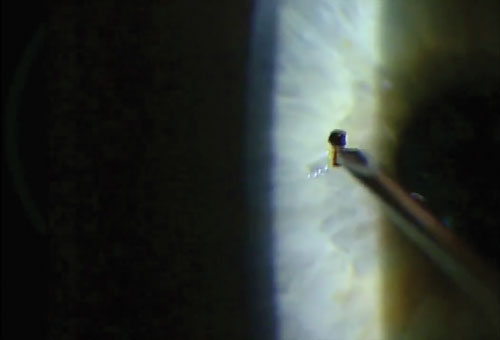
| After taking a good history, recording visual acuity and anesthetizing the eye, it’s time to choose your weapon. A magnetic spud or 25-gauge needle works well to dislodge and remove most superficial metallic foreign bodies without much damage to the surrounding tissue. Always approach the foreign body tangentially to avoid perforating the cornea. |
|
• What? If the entering substance was associated with vegetative matter or a rusty nail, the answer to this question will influence the type of treatment that may be required postoperatively.
• When? This question lends itself to the type of education that you’ll need to provide after removal, as well as being aware if the odds of infection, inflammation and rust have dramatically increased with time. Approximately four to six hours is all the time required for the fluid of the cornea to begin to decompose the iron foreign body and rust begins to leach into the surrounding tissue.
• Where? Although “where?” does not seem as clinically relevant as “what?” and “when?,” it could be one of the most sought-after notations in your record to evaluate worker’s compensation issues, which insurance company will be liable, and other safety issues.
Be sure to note in the record if the patient had safety eyewear on. This could be important to a company policy or, if a personal incident, it opens the door to educate and sell safety glasses to your patient. A pair of safety glasses can seem like a trivial expense in light of the pain, missed work and monetary cost of removing a corneal foreign body.
• How? Asking how the injury happened will assist you in determining the force with which the foreign body entered the cornea and whether or not other scans will become necessary to rule out an intraocular foreign body. It is also important to inquire as to when the patient had their last tetanus shot.
4. Determine Entering
Visual Acuities
After the history, be sure that you or your staff have recorded best-corrected vision before you begin the procedure. For clinical as well as medicolegal reasons, it is extremely important to know the patient’s best-corrected vision before you start. Explaining amblyopia or prior scarring on the witness stand is very difficult if your records don’t indicate prior decreased vision, and you find yourself defending 20/decreased vision after you have removed the foreign body.
5. Anesthetize the Eye
The use of proparacaine prior to the initial evaluation will make your patient more comfortable during the process and enhance the efficiency as well. Instill proparcaine in both eyes to reduce the sensitivity of each eye and assist in preventing reflex movement. If the initial VA was in question due to pain, now’s the time to repeat the VA of the involved eye. Proparacaine is typically the anesthetic of choice but other topical anesthetics, such as tetracaine, also provide the necessary anesthetic effect.
| |
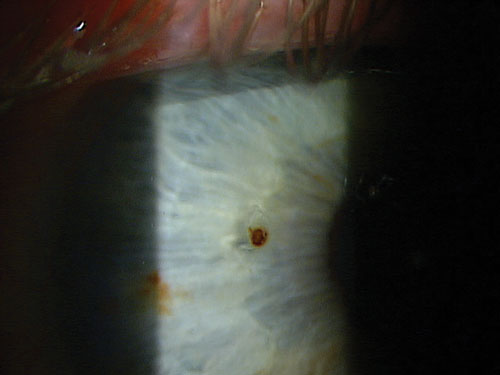
| After the metal particle is removed, re-examine the area. If the metal has been lodged for a few hours or more, a pocket of rust will likely remain. | |
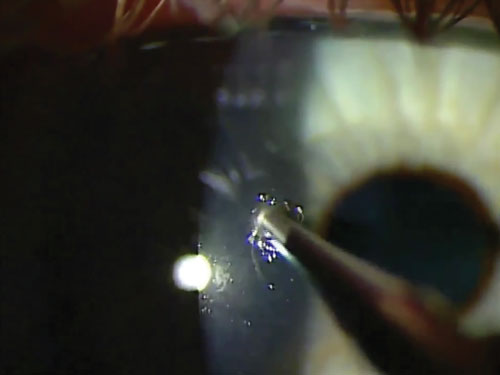 | |
| Rust never sleeps, so it must be excavated. Here, we used an Alger brush. Be sure to hold the instrument at an angle, not perpendicularly, to avoid penetration. |
6. Choose the Right Instrument
The initial step at the slit lamp is to get the lay of the land. Remember that it is certainly possible to have multiple foreign bodies or one in the fellow eye that the patient may be unaware of. The adage, “If it isn’t written down, it isn’t done” applies as with any medical investigation. So, make certain you document the depth of the foreign body, the type of foreign body, the condition of the fellow eye as well as any additional pertinent information.
Be sure to accurately assess the depth of the foreign body, keeping in mind that objects that have penetrated into the stroma are more likely to result in scarring. Also note the proximity to the visual axis.
After the initial survey and assessment of the foreign body, it’s time to choose your weapon. As you look over your choices, take this moment to communicate with your patient about the procedure and possible complications. If you’re concerned about central scarring and potential vision loss, discuss this with the patient before the procedure. If you anticipate needing the Alger brush, explain the process to the patient and give them the opportunity to hear the sound of the motor and be reassured this will be done under anesthetic.
Pause a moment to give the patient a chance to ask questions and assess anxiety before proceeding.
The instrument you choose will be determined by the task at hand as well as personal preference. If the identified foreign body is metallic, consider using a magnetic spud. The advantage of the magnetic spud is that you can sometimes lift out a very superficial metallic foreign body with minimal tissue damage. The spud is also readily available to you for additional depth and scraping if you should need it. The other advantage of the magnetic spud is that you’ll be able to catch the flakes of the metallic material with a swipe around the area, and leave the wound field clean of debris with minimal effort.
In many cases, the best instrument is a needle. A 25-gauge 5/8” needle gives adequate strength and is short enough to avoid flexure. Typically, less surrounding tissue damage is caused when using a needle than a spud. The blunt edge of the spud dramatically reduces the risk of perforation, but in the hands of a steady practitioner, the needle is often preferred.
In a minority of cases, jeweler’s forceps may be the best choice. If the foreign body is of vegetative matter, or simply adhered to the cornea without true penetration, jeweler’s forceps is often the instrument of choice so that no additional tissue is damaged and the material simply lifts off the cornea.
7. Take a Tangential Approach
Always approach the foreign body tangentially to avoid corneal perforation. Giving the patient a target to focus on will slow down eye motion and decrease patient anxiety. Entering at the temporal peripheral edge of the foreign body, with a depth just slightly deeper than the foreign body, generally results in removing the offending agent with minimal collateral damage. A subtle flicking motion usually completes the procedure.
8. Remove the Rust Ring
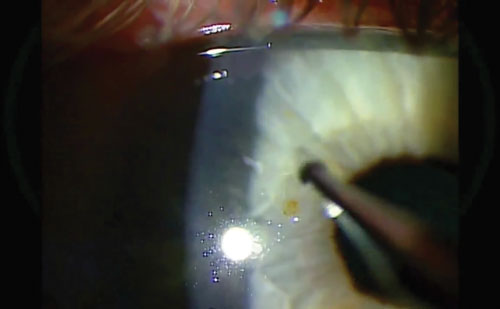
After removal of a metallic foreign body, re-evaluate the excavation area for the presence of rust. If metal is lodged in the cornea for more than four to six hours, rust will begin to form in the adjacent tissue. This is typically seen as a brownish-orange ring that appears to feather into the surrounding tissue. A dense brown patch is also typically noted in the bottom of the excavated area. Although the rust ring can occasionally be lifted in its entirety with a jeweler’s forceps, an Alger brush will be required in the vast majority of cases to free the area of rust. Be sure to use a clean, sterilized tip for each case.
The Alger brush should be brought toward the area tangentially. Although the stroma is difficult to penetrate with an Alger brush, it’s still prudent to work tangentially and not perpendicularly. It’s also easier to control the Alger brush depth from this angle.
|
|
| Don’t be afraid to apply pressure to get the rust out. And take a few passes at it. In between, give the patient the opportunity to blink. Even so, a trace of rust may remain, as seen here. |
|
|
|
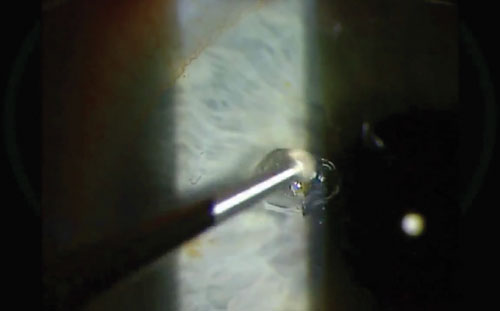
| To get out the last of that deep, stubborn rust, try holding the Alger brush in your other hand. This automatically reverses the direction of burr’s rotation within the wound to scour it well. |
|
In some cases, slight pressure is required to adequately remove the rust. Although the rust may loosen with time and rise closer to the surface, try to remove as much rust as possible at the initial visit to prevent re-entry into the area, which will disturb epithelial healing. A slight amount of rust left in the center of the excavated pit will dissipate with time, and based on the clinician’s judgment, it’s often less traumatic to leave a slight amount of rust as opposed to excessive tissue disruption. Keep in mind that remaining rust will create inflammation and retard healing, so do your best to leave the wound as clean and rust free as possible.
If confidently ambidextrous, hold the burr in your opposite hand to allow the spinning motion of the blade to approach the wound in the opposite direction and loosen stubborn areas of rust.
After successfully burring the rust away, pass the magnet around the area to remove any filings. Rinse the eye with saline to clean the field as well.
9. Do a Double Check
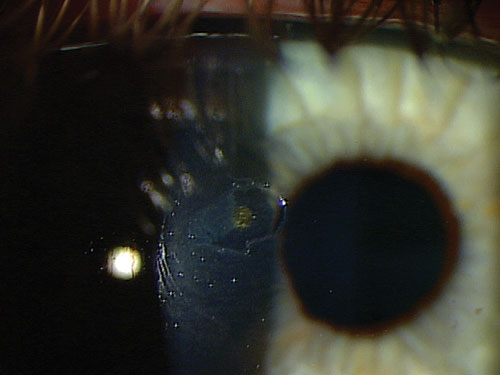
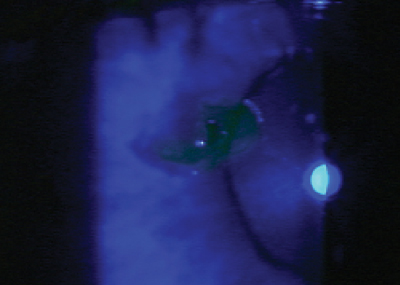
After successful removal, be certain to re-evaluate the area. Evaluate with white light, and also look for any foreign matter that might have fallen into the lower palpebral conjunctiva. Do a finalized inspection with sodium fluorescein and cobalt blue filter to review and document the extent of the evacuation and to be certain no foreign matter or additional foreign bodies exist.
10. Rx Appropriately
Postoperatively, place the patient on a broad-spectrum antibiotic for one week. (Keep in mind that diabetic patients typically re-epithelize at a slower rate.) Pain management depends on the extent of tissue damage and the depth of the foreign body, as well as the level of inflammation and infection.
A bandage contact lens can also reduce discomfort. It creates an artificial surface that provides protection from continual tearing of the epithelium, promotes healing and decreases the risk of corneal erosion. But use the bandage contact lens with caution. If placed on the eye of a patient without contact lens experience, it might inadvertently be dislodged or taco-rolled, leading to another phone call from the patient concerned about the discomfort produced. Also, a bandage contact lens may contribute to a more infective climate, so monitor the patient closely. Be sure to remove the contact lens in 24 hours to check the cornea for edema and striae as well.
Standard of care dictates that corneal foreign body cases be seen in 24 hours, but that certainly varies depending on the severity and the depth of the foreign body.
Pressure patching is another method of controlling pain, but finds less favor with patients who are still leading an active lifestyle, and is often unnecessary.
In the case of non-central superficial foreign bodies, a topical antibiotic is typically all that’s required. If excessive inflammation has already occurred or the amount of burring required was extensive, the use of homatropine BID for three days, in conjunction with the topical antibiotic, often provides adequate pain management and decreases the risk of iritis.
Topical non-steroidal anti-inflammatory agents can also assist in pain management without jeopardizing epithelial healing. Steroids, even in the presence of iritis or ensuing iritis, are relatively contraindicated until re-epithialization has been noted.
| |
|
|
|
| After successful removal of the foreign body and residual rust, do a final inspection with white light. Rinse the eye with saline and use a magnet or swab to remove any metal filings or debris, particularly in the lower palpebral conjunctiva. Lastly, stain the eye, then measure and document the lesion. Schedule the patient for a one-day follow up, and prescribe a broad-spectrum antibiotic. |
In the case of central foreign bodies, its depth determines the level of medication. Superficial corneal foreign bodies—regardless of their location—will not scar. But if the foreign body is centrally located and has penetrated into the stromal layer, scarring will result. So, consider steroids to help reduce the scarring and risk for potential vision loss. The dosage and duration of the steroid varies depending on the depth of the foreign body, the amount of inflammation and the risk of scarring, but the most common dosage is QID for seven to 10 days, followed by a short taper. Be aggressive and use a strong steroid, such as prednisolone acetate, difluprednate or loteprednol 0.5%.
An amniotic membrane, such as the Prokera Slim device (Bio-Tissue), may also be appropriate for those central, deep foreign bodies where the risk of scarring is great.
11. Revisit on Day One
Significant healing should be noted within 24 hours. The most common concerns at postoperative visits are infection, iritis and recurrent corneal erosion.
12. Bill Properly
No job is complete until the paperwork is done. The code commonly used is 65222 (Corneal foreign body removal with slit lamp). Be certain to use modifiers to indicate if more than one foreign body was removed. This code does not have a global post-op period, so it is appropriate to bill an E/M code for follow-up visits.
Corneal foreign bodies can represent a scary, vision-threatening situation to the patient. With the proper patient education, foreign body removal technique and treatment, you will have the metal and rust out of the cornea efficiently and effectively. Your patient will leave feeling significantly better and you will have gained a patient to your practice.
Assuming the phone call came at half time, you can be back for the exciting second half and you’ll enjoy it knowing you’ve done an outstanding service for your patient, and your patient will enjoy the second half reassured they are in good hands and made the right call.
Dr. Shetler is an assistant professor and chief of the university clinic facilities at the Oklahoma College of Optometry.
Dr. Lighthizer is the assistant dean for clinical care services, director of continuing education, and chief of both the specialty care clinic and the electrodiagnostics clinic at the Oklahoma College of Optometry.

