Part one of the “Lost Arts” series detailed the intricacies of binocular indirect ophthalmoscopy and provided tips for scleral depression (see
A Refresher on Scleral Depression, August 2013). This installment focuses on a skill that many optometrists perform on a routine basis––fundus biomicroscopy.
A dilated fundus examination with slit-lamp biomicroscopy is essential to a complete stereoscopic health evaluation of the optic nerve, macula, vitreous and retina. But do you remember the “tricks of the trade” that experts use to maximize performance? Here are six tips to improve your examination skills.
1. Use Your Tools Effectively
Many optometrists have a favorite fundus biomicroscopy lens for general applications. Just keep in mind, depending upon the condition being examined, you can select from a variety of lenses that can be used in concert to maximize your view of the patient’s retina.
For example, the optic nerve and macula are best examined through a low-dioptric (60D) biomicroscopy lens. These low-powered lenses permit greater magnification without requiring the examiner to use the high mag of the biomicroscope, which can yield a slightly hazy view due to diffraction.
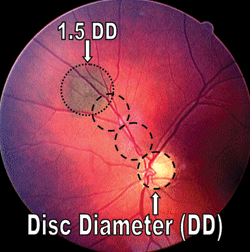
1. Be sure to use disc diameters when determining the size and location of retinal lesions.
Additionally, with such high magnification, the examiner can acquire a clear, detailed view of the neuroretinal rim tissue. This is essential in the diagnosis and management of glaucoma, or when visualizing neovascularization of the disc.
Further, a detailed view of the macula is essential when observing the internal limiting membrane, identifying a subtle epiretinal membrane or examining for retinal pigment epithelium (RPE) changes indicative of early macular disease.
Any biconvex fundus biomicroscopy lens produces an inverted image. Anatomically, the optic nerve appears nasal to the fovea. When viewing through a biconvex fundus lens, the optic nerve looks to be temporal to the nerve and the superior retina appears inferiorly.
At first, it is easy to forget this principle; however, it is absolutely essential to record a lesion’s correct location. For example, when observing the area near the first arterial bifurcation through a biomicroscopy lens, any lesion that appears in the superior portion of the view actually is located inferiorly in the eye. As such, the entity should be documented accordingly in the medical record.
After performing binocular indirect ophthalmoscopy (BIO), it may be useful to examine a peripheral retinal lesion in more detail via slit-lamp biomicroscopy. Peripheral fundus lesions are seen well with a high-powered, non-contact lens such as a 90D SuperField (Volk Optical) or an Ocular MaxField Standard 90D (Ocular Instruments).
These lenses allow the examiner to observe questionable retinal lesions in greater detail than with BIO alone. The combined views from BIO (with or without scleral depression) and the peripheral non-contact biomicroscopy lens likely yield all the required information necessary to make a specific diagnosis.
To view the peripheral retinal lesion with the slit lamp, instruct the patient to look in the direction of the lesion. Once the lesion is visualized with the fundus lens of your choice, move the slit lamp away from the area to be examined.
For example, a lesion located at 12 o’clock can be seen by asking the patient to look straight up. When the biomicroscopy lens is centered over the pupil and the fundus is visualized, move the slit lamp downward (usually by rotating the joystick counterclockwise) until the lesion can be seen.
| Viewing Peripheral Retinal Lesions with Non-contact Fundus Lenses |
1. Instruct the patient to look in the lesion’s direction. |
2. Size Matters
Fundus photography is helpful in establishing and tracking the exact size of a retinal lesion, such as a nevus. However, if fundus photography is unavailable, remember to delineate the lesion’s horizontal and vertical measurements along with any other relevant detail.
Most practitioners use the patient’s optic disc diameter as a reference point when determining the retinal lesion’s dimensions. This approach is quite useful, because the optic disc diameter generally will not change over time.
However, some patients exhibit obliquely inserted discs, peripapillary atrophy or other optic disc anomalies that make it more difficult to establish an anatomical benchmark for comparison.
By using optic nerve transillumination with a parallelepiped slit image off to either side, the examiner can distinguish the disc outline to calculate a more accurate estimate of the optic nerve head size.
Additionally, when a retinal lesion is identified, be sure to track its exact anatomical location using disc diameters (DD) as a guide. For example, figure 1 shows a choroidal nevus 1.5DD in size that was located 2DD superotemporally to the optic nerve head along the superior arcade.
3. Always Use a Filter
A red-free examination is extremely useful when examining patients with glaucoma or other optic nerve disorders. Use the red-free filter to highlight wedge defects located in the retinal nerve fiber layer or to distinguish optic nerve head drusen.
By obscuring retinal hue, a red-free filter dramatically enhances the appearance of blood vessels as well as preretinal, intraretinal and subretinal blood.
Red-free filtering makes some retinal lesions, such as microaneurysms and dot/blot hemorrhages, look dark black and well demarcated.
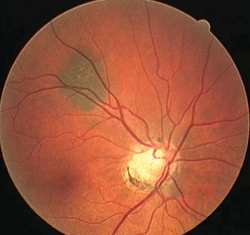
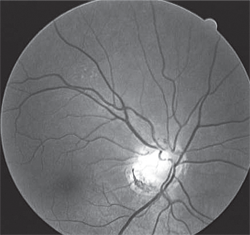
2, 3. A nevus in white light (left) and red-free light (right). Note its disappearance.
Further, it causes cystoid macular edema to appear as a light gray, fluid filled area in the macula.
Also, changes in the arteriovenus crossings or scattered areas of blood leakage appear increasingly highlighted upon red-free filtering.
Because the RPE attenuates red-free light, a filter can be used to determine the etiology and depth of a retinal lesion.
Deeper structures located below the RPE (e.g., choroidal nevi) disappear or diminish with the use of the red-free filter, whereas more superficial entities located above the RPE (e.g., hypertrophy) remain (figures 2 and 3).
Optic nerve head drusen (mitochondrial calcification) generally becomes visible at the disc surface in the second to third decades of life.1 The drusen appear as highly reflective spherical nodules that can give the disc a scalloped margin appearance.
Red-free light causes these retractile bodies to autofluoresce, which may help distinguish them from other anomalies (e.g., peripapillary atrophy).
4. Work Up the Nerve
Optic disc hemorrhages are a risk factor for progression in all forms of glaucoma. Surprisingly, they are easy to overlook during a standard funduscopic examination.
According to the Ocular Hypertension Treatment Study (OHTS), eye care practitioners missed almost five times as many optic disc hemorrhages through slit-lamp biomicroscopy than via fundus photograph observation.2
However, not every practitioner takes fundus photographs––or even has a fundus camera to use––at every exam.

4.
Here is an illustration of the proper vertical cup-to-disc assessment
method, with symmetrical superior and inferior rim tissue.
Take a systematic approach when evaluating the optic nerve for glaucoma, looking specifically for disc hemorrhages. Be aware that they often appear near areas of peripapillary atrophy, notching or nerve fiber layer defects.
Two-thirds of glaucomatous optic disc hemorrhages appear inferotemporally.3 Both vertical cup-to-disc (C/D) ratio and neuroretinal rim tissue size are crucial factors in diagnosing glaucomatous optic nerve damage. Fortunately, neither metric requires expensive diagnostic imaging.
When evaluating the optic nerve and/or performing fundus biomicroscopy, the C/D ratio is important because it provides indirect information about the neuroretinal rim tissue (figure 4).
To better define your neuroretinal rim tissue estimation, record the horizontal C/D ratio. Additionally, when recording the vertical C/D ratio, include the superior and inferior rim measurements.
A patient with early glaucoma can exhibit a vertical C/D ratio of 0.6, which––at first blush––does not sound glaucomatous. However, a superior neuroretinal rim tissue width of 0.3 and an inferior neuroretinal rim tissue width of 0.1 would be highly suspicious for early glaucomatous damage due to the asymmetry.
5. Master the Macula
For practitioners who do not have immediate access to an optical coherence tomography device, a Watzke-Allen test is helpful in differentiating macular holes from pseudoholes (figure 5).
For this test, you place a narrow slit-lamp beam over the fovea, then ask the patient to look directly into the center of the beam and describe its overall appearance.
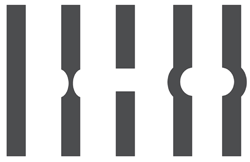
5. Potential patient responses when performing the Watzke-Allen test.
If the patient says that the beam looks unbroken and completely rectangular, the macula is most likely intact.
If, however, he or she reports that the beam appears narrow or distorted in the center, this could indicate a partial-thickness (lamellar) hole.
Finally, if the patient says the beam as looks broken in the center, he or she may have a full-thickness hole.
Vision usually is significantly compromised at this point, and the patient may further describe missing areas of text when reading.
To perform the test accurately, it is helpful to present the beam both horizontally and vertically. More effective patient responses are elicited when the individual is given visual examples to choose from.
If the macula of the opposite eye appears generally healthy, performing the Watzke-Allen test in that eye may provide the patient with a point of comparison.
6. ‘We’ve Got Your Back’
Patients must be comfortable during clinical procedures. However, throughout a busy workday, it is easy to overlook your level of physical comfort. Optometrists perform slit-lamp biomicroscopy numerous times every day.
Compared to family practice practitioners, eye care professionals report a much higher incidence of neck, back, hand and wrist pain.5
Ergonomic considerations are essential because, over time, poor posture will take its toll on the body––leading to decreased efficiency, unwanted aches and pains, and even musculoskeletal disorders.


6, 7. Improper patient/doctor ergonomic posture (left) vs. proper ergonomic posturing (right).
How many times have you found yourself in an awkward position while performing slit-lamp biomicroscopy?
Have you ever used the slit lamp and suddenly realized that your neck is hyperextended, your back is strained and your fingers feel tingly?
Eventually, this type of repetitive strain can be detrimental to your career and quality of life.
It is always better to adjust the patient’s orientation to best accommodate your positioning than vice versa. Be sure to use an adjustable chair and slit-lamp table.
When sitting behind the slit lamp, take the extra time to raise or lower the patient to a height where your back remains straight while you look through the oculars.
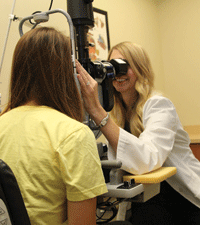
8. The use of a foam pad at the slit lamp can reduce elbow stress tremendously.
Move the chair and slit lamp to best suit your needs (figures 6 and 7).
Years of performing fundus biomicroscopy with your elbow on the table can lead to ulnar neuropathy.
This occurs as a result of ulnar nerve entrapment due to constant pressure applied to the elbow.
The ulnar nerve controls fine movements of the hand and runs through the bony groove at the elbow, which has very little fat protection.
Most people know the result of ulnar nerve stimulation when they feel the tingle of hitting their “funny bone.”
Unfortunately, years of ulnar nerve compression while performing fundus biomicroscopy can lead to finger numbness and/or hand weakness.
A good way to avoid this condition is to cushion and support the elbow by attaching a thick, soft-foam pad to the slit-lamp table (figure 8).
Remember to practice your funduscopy technique on a regular basis to ensure that it does not become a “lost art” for you.
If you are interested in improving your gonioscopy skills, be sure to read the final installation of our series: “Going Back to Gonio.”
Dr. Walling is a professor and chief of the Medical and Surgical Service at the Michigan College of Optometry’s University Eye Center in Big Rapids. Dr. Dinardo is an assistant professor at MCO.
1. Auw-Haedrich C, Staubach F, Witschel H. Optic disc drusen. Surv Ophthalmol. 2002 Nov-Dec;47(6):515-32.
2. Budenz DL, Anderson DR, Feuer WJ, et al. Detection and prognostic significance of optic disc hemorrhages during the Ocular Hypertension Treatment Study. Ophthalmology. 2006 Dec;113(12):2137-43.
3. Kuldev S. Finding and responding to disc hemorrhages. Rev Opthalmol. 2010 Apr;17(4):102-4.
4. Tanner V. Williamson TH. Watzke-Allen slit beam test in macular holes confirmed by optical coherence tomography. Arch Ophthalmol. 2000 Aug;118(8):1059-63.
5. Kitzmann, AS, Fethke NB, Baratz KH, et al. A survey study of musculoskeletal disorders among eye care physicians compared with family medicine physicians. Ophthalmology. 2012 Feb;119(2):213-20.
Volk Low Power/High Magnification Lenses
Lens Power
Field of View (in degrees)*
Image Magnification
Working Distance
Comments
60 D
68/81
1.15x
13mm
High magnification; detailed disc and macular evaluation
78 D
81/970.93x
8mm
Good general-use lens
Super 66
80/96
1.0x
11mm
High magnification; detailed disc and macular evaluation
Digital 1.0x Imaging
60/72
1.0x
12mm
High magnification; detailed disc and macular evaluation
Digital High Mag
57/70
1.30x
13mm
Very high magnification; detailed disc and macular evaluation.
Volk High Power/Low Magnification Lenses
Lens Power
Field of View (in degrees)*
Image Magnification
Working distance
Comments
90 D
74/89
0.76x
7mm
Good general-use lens; useful for small pupils; good for peripheral retinal viewing
Superpupil XL
103/124
0.45x
4mm
Useful for small pupils; miniaturized version of SuperField NC lens
Superfield NC
95/116
0.76x
7mm
Magnification of 90 D with large field of view
Super Vitreofundus
NA
NA
NA
Useful for small pupils; good for peripheral retinal viewing
Digital Wide Field
103/124
0.72x
4-5 mm
Good general-use lens; useful for small pupils; good for peripheral retinal viewing
Ocular Instruments Low Power/High Magnification Lenses
Lens Power
Field of View (in degrees)*
Image Magnification
Working distance
Comments
Ocular MaxField 54D
86/137
1.10x
10mm
High magnification; detailed disc and macular evaluation
Ocular MaxField 60D
85/154
1.0x
10mm
High magnification; detailed disc and macular evaluation
Ocular MaxField 66D
91/144
0.91x
8mm
High magnification; detailed disc and macular evaluation
Ocular MaxField 72D
102/155
0.83x
7mm
Good general-use lens
Ocular MaxField High Mag 78D
88/154
0.98x
10mm
Good general-use lens
Ocular Instruments High Power/Low Magnification Lenses
Lens Power
Field of View (in degrees)*
Image Magnification
Working distance
Comments
Ocular MaxField 84D
105/158
0.71x
5mm
Good general-use lens; useful for small pupils; good for peripheral retinal viewing
Ocular MaxField Standard 90D
94/153
0.75x
5mm
Good general-use lens; useful for small pupils; good for peripheral retinal viewing
Ocular MaxField 100D
110/146
0.60x
4mm
High-power lens with large field of view
Ocular MaxField 120D
120/173
0.50x
4mm
High-power lens with large field of view
Ocular Ultra View Small Pupil 132D
99/158
0.45x
4mm
Useful for small pupils; good for peripheral retinal viewing
* Static field of view/dynamic field of view

